Public addresses
Assign and release the public addresses of a server in the console, add a public network card when you create it, and allow outgoing mail.
A public address comes from an IP pool on one of the networks of the server. You need the privilege Network.Assign on one of the networks of the server and VirtualMachine.Config.Settings on the server; without them the buttons are disabled and the tab says which privileges are missing. The server needs a network adapter on a network that has an IP pool.
In the console
Assign an address
Select the server in the inventory, open the tab Networks and find the card Public addresses.
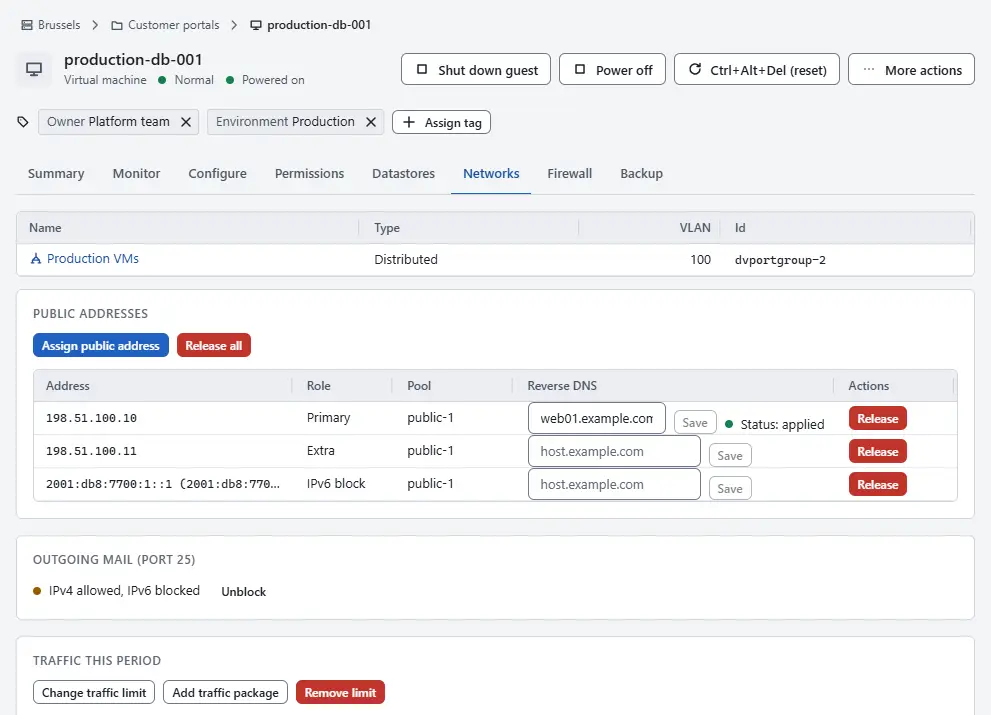
Select Assign public address.
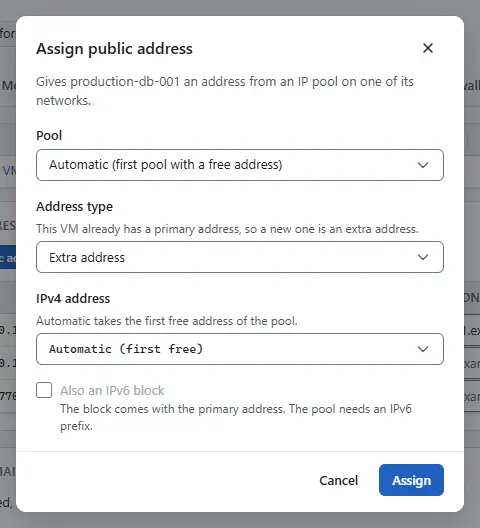
- Choose the Pool. Automatic (first pool with a free address) takes the first pool on the networks of the server that has a free address. The list shows the number of free addresses next to each pool, and a full pool cannot be chosen.
- Choose the Address type. A server without a primary address gets Primary address (first address of the VM); once it has one, a new address is an Extra address.
- When several network cards of the server are on the network of the pool, choose the Network card.
- Choose the IPv4 address: Automatic (first free) takes the first free address, or pick one of the free addresses of the pool. The list shows the first 256 free addresses and says when there are more.
- Leave Also an IPv6 block checked to add an IPv6 block. A block comes with the primary address only, and the pool needs an IPv6 prefix.
- Select Assign.


If someone else got the chosen address in the meantime, the dialog says so, lists the free addresses again and stays open so that you can choose another one.
After the assignment the tab shows the notice Next step in the guest. A running server gets the primary IPv4 address through DHCP after a reboot or when its lease renews. Extra addresses and the IPv6 block are not set up automatically; configure them in the guest, for example with cloud-init, using the address in the table and the IPv6 gateway of the pool. The network of the server lets it send only from its own addresses, whatever the port-security setting of the network.
Release an address
- On the card Public addresses, select Release on the row of the address, or Release all for every address of the server.
- Confirm with Release or Release all.
The address goes back to its pool and into quarantine for the period that the confirmation names, 14 days by default. It cannot be given out again before then, its reverse DNS name is removed and the guest loses the address. An IPv6 address is released as its block.
Add a public network card when you create a server
Open the wizard New virtual machine on a cluster and go to the step Network.
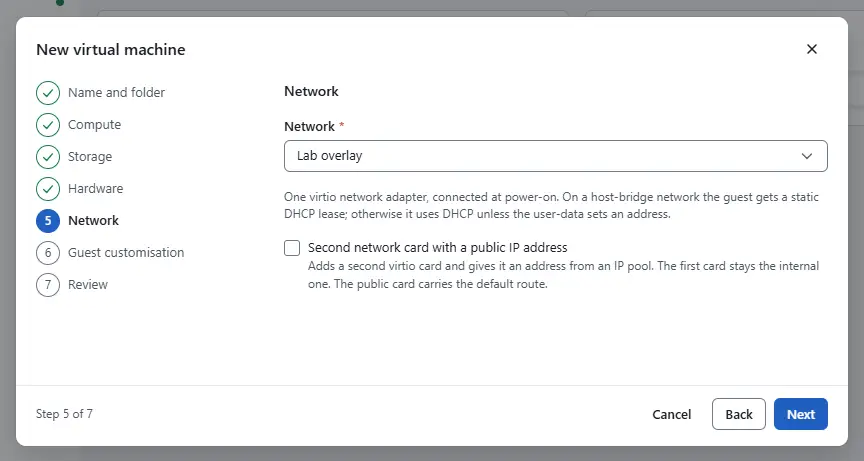
- Choose the Network of the first card, which stays the internal one, and check Second network card with a public IP address.
- Choose the Network of the second card of the second card, the IP pool on it (with its number of free addresses; a full pool cannot be chosen) and the IPv4 address: Automatic (first free) or one of the free addresses.
- Check Also an IPv6 block for an IPv6 block when the pool has an IPv6 prefix.
- Keep Power on after creation checked on the review step to start the server afterwards, then select Create.

The wizard creates the server with two virtio cards, the second with its own MAC address, and allocates the primary address and the block to that card. For a guest with cloud-init it also writes the network configuration: both cards use DHCP for IPv4, the public card carries the default route, and the IPv6 block is set on the public card with the IPv6 gateway of the pool. The block is known only after the allocation, so the wizard reconfigures the server before its first start. A guest without cloud-init, such as Windows, gets the card and the address but no network configuration; it configures the card itself, and DHCP gives the IPv4 address.
If an allocation or the reconfiguration fails, the server is kept and stays powered off. The wizard shows the error, and the tab Networks of the server can assign the address.
Allow outgoing mail
Outgoing mail on port 25 is blocked or allowed per pool. On the Networks tab, the card Outgoing mail (port 25) shows the state for IPv4 and IPv6. Select Unblock for a server whose mail is legitimate, and Block again to undo it. Every change is in the events.
Result
The address appears in the table of the card Public addresses with its role and pool, and in the allocations of the pool on the page IP pools.
Automation
With the CLI
kyvernon addresses assign vm-42 --tenant tenant-a          # primary IPv4 and a /64
kyvernon ip-pools allocate ippool-1 --vm vm-42 --extra     # an extra IPv4 address
kyvernon addresses list vm-42
kyvernon addresses release vm-42                           # everything back to the pool
kyvernon addresses smtp vm-42 --unblock --reason "ticket 1234"
With the API
| Task | Request |
|---|---|
| Read the addresses of a server | GET /v1/vms/{id}/addresses |
| Give a server its primary address and a /64 | POST /v1/vms/{id}/addresses |
| Add an extra address, or choose address and card | POST /v1/ip-pools/{pool}/allocations with vmId and optionally mac, address, extra |
| Release one address | DELETE /v1/ip-pools/{pool}/allocations/{address} |
| Release every address | DELETE /v1/vms/{id}/addresses |
| Read or change outgoing mail | GET and PUT /v1/vms/{id}/smtp |
A named address that another caller took first fails with error.ip_pool.address_in_use.
Related
- IP pools shows free addresses and quarantine.
- Reverse DNS sets the name of an address.
- Networking concepts explains how an address reaches a server.
Version 0.1. Last changed: 2026-11-14